I've been teaching my Second Graders about the Life Cycles of Nature and and now we've moved onto learning about animal habitats. We took a little break inbetween the two and they each had the opportunity to create a block for our classroom quilt:

I know many of you have children and grandchildren, so I thought I'd share our process of creating these adorable blocks as I can truly see this being a fun and easy project for children of all ages. Here are a few tips that will guarantee a successful outcome:
Supplies Needed:
White Cotton Fabric
Fabric Markers
Black Sharpie
Freezer Paper
Drawing Template
Part 1:
C HILDREN CREATING THEIR BLOCKS
First: Have children draw their picture on a paper template. I took an 8 1/2"x10" piece of paper and drew an 8 1/2" square for the students to draw their picture in:
Depending on their age, review with them detail and scale. I was very specific with my seven year old students that we wanted to just draw one animal very well. The animal was going to be the focus of their block. I told them we were not going to add a "
background/setting" to their picture.
(I had examples to show them) It was also helpful to have a variety of animal books on hand for my students to browse through.

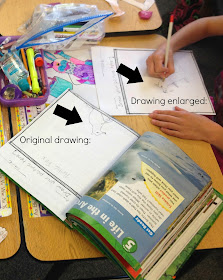
As children get older and begin to draw with more detail, they actually begin to draw smaller. In this case, I just enlarged their drawing and helped them "
center" and trace their enlarged drawing on a new piece of paper. I also instructed them to concentrate on the outline of their animal right now and reassured them that they would be able to add details and color to their animal picture once it was on the fabric.
The final step is to have them trace their picture with a sharpie marker. This will make the picture more transparent when it's time to trace it onto the fabric.
(Notice not a lot of details right now.)
Next: Prepare the fabric squares. Cut enough 9" squares (plus a few extra) out of the white cotton fabric. Then: Iron these squares to Freezer Paper. This was a lifesaving step!! This step really helped "stabalize" the fabric and the students had no problem tracing and drawing on the fabric.

Once you have the fabric squares prepared and the students drawings outlined,
place the fabric/freezer paper square over their drawing. Tape the four sides down as this eliminates the block from shifting. (Be sure the tape is attached to the fabric and paper as shown by the arrows below.)
Using fabric markers, have students first trace their drawing. Once their picture is traced, they can now begin coloring and adding details to their block. My Second Graders really enjoyed this project and I think your children and/or grandchildren would too.
Click
HERE to see this 2014 Classroom Quilt Finish
Click
HERE to see our 2017 Classroom Quilt Finish
Washing Note: I used two color catchers in the first wash. No color run.
And the fun only continued as yesterday found us off on a field trip to a Learning Center in Boise, Idaho. (About 45 minutes away.) What's kinda cool about this center is some of the instructor's are actually Science Majors from Boise State University. (I always enjoy watching the interaction between older and younger students.)
So, I thought it would be fun to also share a few games from our adventure yesterday:
Students learned about the diversity of animals that live in our foothills and the elements that make up this habitat. On their trail walk, students looked for signs of animals, explored where different animals might live, and what they need to survive.
Can You See Me?
Playing a predator/prey game of hide and seek.
Students played an active game of "Hawks and Lizards" that demonstrated the effectiveness of camouflage for prey animals. Students experienced first hand good and not-so-good examples of camouflage.
As a teacher I may plant the learning seeds, but it isn't until students are truly engaged through independent practice that the real learning occurs! I hope you enjoyed a peek into my life as a teacher. We're certainly having a great week in Second Grade!
With smiles,
Val:)


.jpg&container=blogger&gadget=a&rewriteMime=image%2F*)





.JPG)


.JPG)


